Client Stories
POLDER: share and monetize data on a decentralized basis
The POLDER project is a solution aimed at smart cities for the exchange, re-utilization and monetization of data
FiWARE is a framework of open source components to accelerate the development of smart solutions.
FiWARE is a framework of open source components to accelerate the development of smart solutions. All the components can be deployed natively, using docker... but in this article, we will deploy FiWARE components using Kubernetes. The components we will deploy are:
We will be working using EKS, the AWS service that offers the possibility of deploying and managing a Kubernetes cluster in the AWS cloud. The cluster's deployment and the installation and configuration of needed CLI tools like aws and kubectl won't be covered by this article. Still, you can check this documentation to get it all up and running easily.
You will also need to install in your cluster some resources before continue:
The next step should be to configure three databases:
Last (I promise), we will need a tool called helm that will ease the deployment process of all our FiWARE components. You can get it here alongside some documentation.
With all the above ready, we can start deploying our FiWARE modules. We will use helm to do it, a handy CLI tool that allows us to create and install charts in our cluster. A chart contains all the necessary elements for a certain application or resource to work in our Kubernetes cluster.
We will use a chart available in this Github repository, clone the repository to a known place, we are going to play with it a bit. From the repository, we will only care about the folder called charts and the file called override-values-example.yaml, the rest are files used to configure part of the architecture you already set up before in an automatic way using Terraform.
Inside charts/polder, you can find all the Kubernetes elements we are gonna deploy in our cluster in the form of helm templates. Also, you can check the values.yaml file in this folder, which contains some values used by the templates. You shouldn't need to change anything here, but if you want to change the number of resources per FiWARE component used for autoscaling, you can do it here.
Let's check now the override-values-example.yaml, make a copy of it and name it override-values.yaml (It is like a .env file, really). In this file, you should fill all the empty strings to configure the SSL certificate, domains for the exposed FiWARE components, and environment variables for every FiWARE module.
Check the next example to configure your nginxConf variable, just change the server_name with your Wirecloud domain and you should be good to go:
|
At this point, you should be able to fill all the variables except for SOCIAL_AUTH_FIWARE_KEY, SOCIAL_AUTH_FIWARE_SECRET, PEP_PROXY_APP_ID, PEP_PROXY_USERNAME, and PEP_PASSWORD. We will need to create an application in Keyrock first to get these values so let's deploy!
Open a terminal, move to the repository you cloned and execute this command:
helm upgrade --install --create-namespace --atomic -f override-values.yaml fiware ./charts/polder --namespace fiware
After a while, you should see how the different resources are installed in your cluster, and the command will print information about the new release you just did. If you run helm list -n fiware you should be able to see something like this:
|
Go to your Keyrock domain and log in using the credentials you specified in the override-values.yaml. Register a new application and fill in the information and click next:
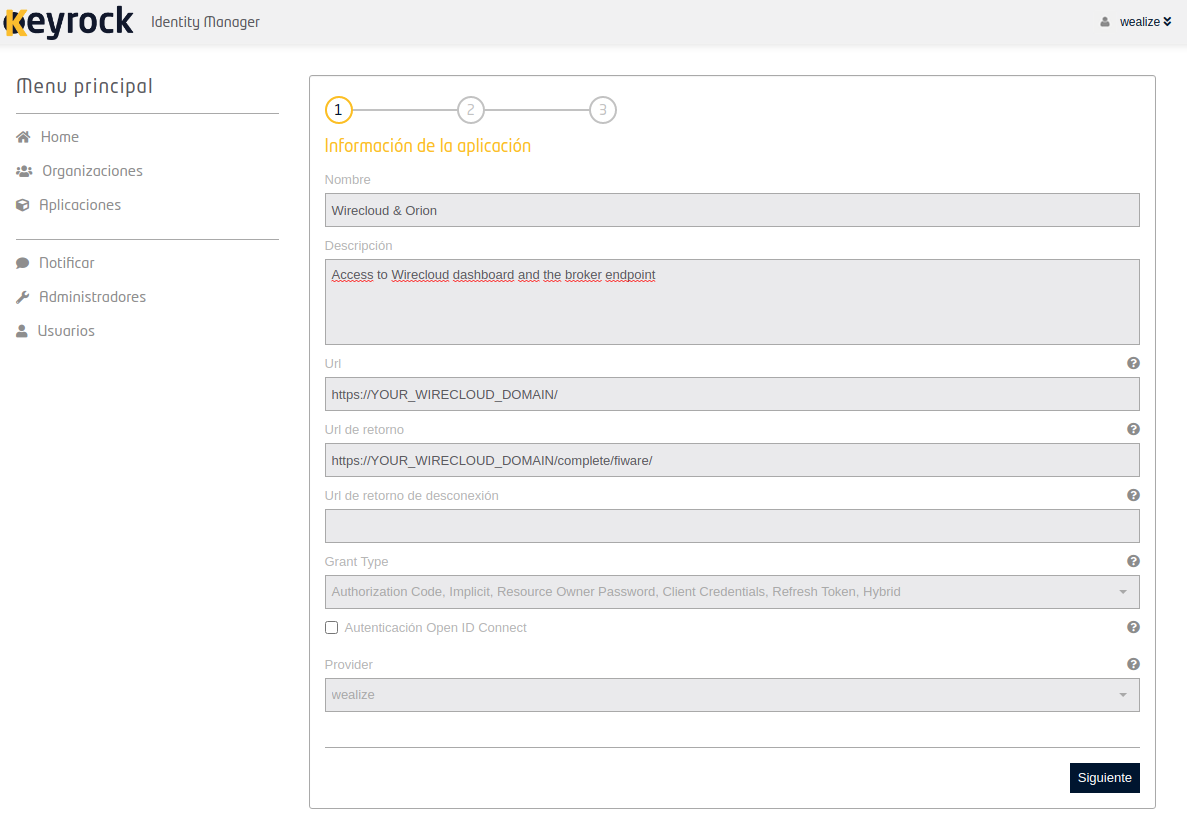
The next step is to give the application an image. You can ignore it if you want and click next. The third and last step allows you to create roles for the users authorized to use this application. You can click the safe button and do that later; the default ones are ok.
After that you will see your new application in the home screen, open it and you should be able to get some of the variables you couldn't fill before:
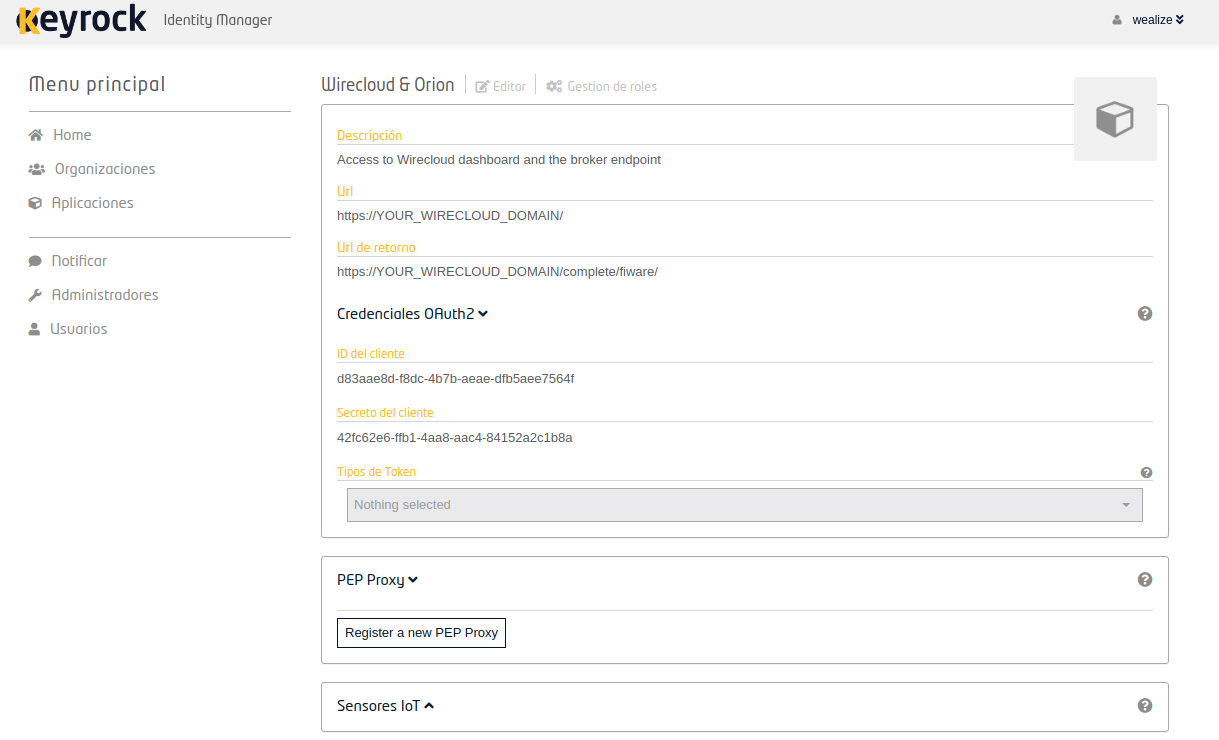
The SOCIAL_AUTH_FIWARE_KEY is the client ID, and the SOCIAL_AUTH_FIWARE_SECRET is the client secret. To get the last variables, you have to click in Register a new PEP proxy, and the page should look like this now:
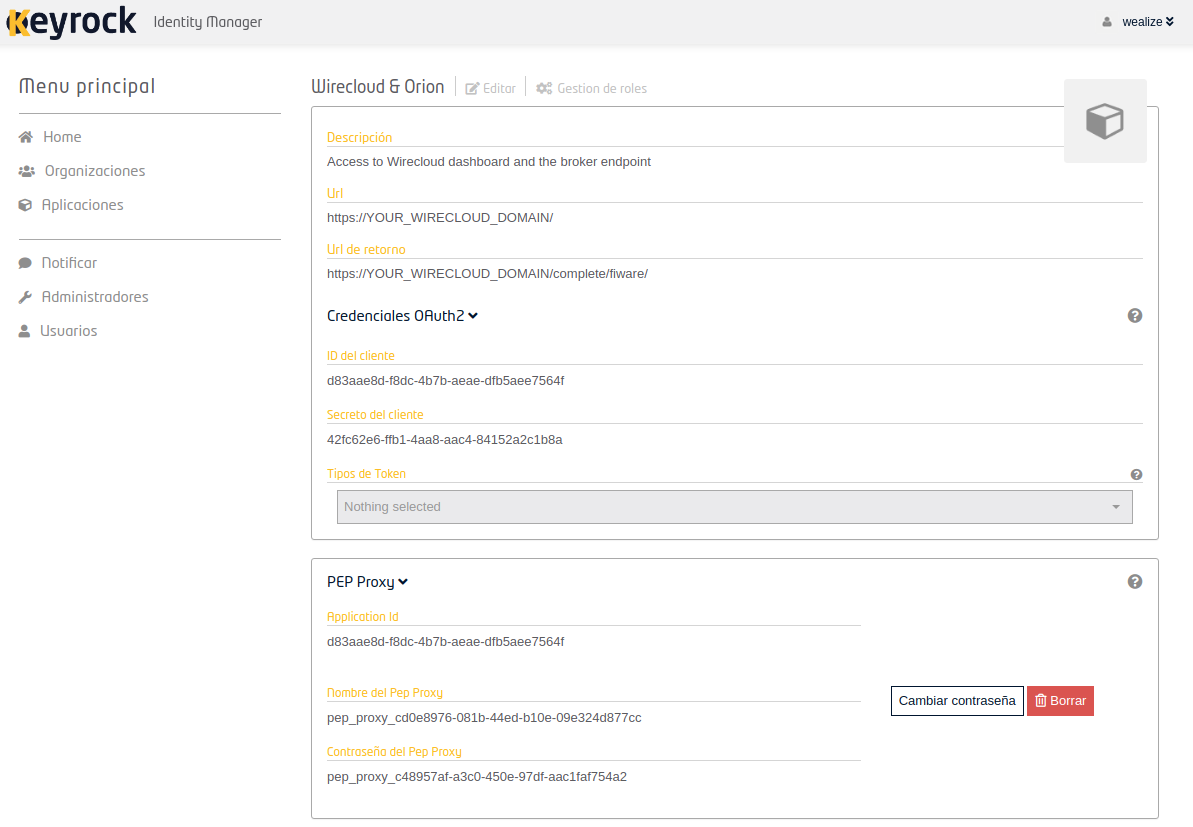
There you can see the PEP_PROXY_APP_ID, PEP_PROXY_USERNAME, and PEP_PASSWORD variables. Fill in all the variables and execute this command in the cloned repository again to apply the changes to Wilma and Wirecloud:
helm upgrade --install --create-namespace --atomic -f override-values.yaml fiware ./charts/polder --namespace fiware
Wait for it to finish and everything should be working now, you can access Wirecloud login through Keyrock (Will ask you if you trust the application the first time) and Orion can be accessed getting a token from Keyrock (Remember that is behind Wilma):
|
After installing our chart, an ingress (with a lot of more stuff) will be created in the cluster, and AWS will create a load balancer on-demand with a primary DNS registry. Use it to point domains to the applications exposed in the cluster.
As the load balancer is created on-demand, if you uninstall the chart from the cluster and install it again, your load balancer DNS registry will change because that load balancer is, in fact, a different one.
The POLDER project is a solution aimed at smart cities for the exchange, re-utilization and monetization of data
Realfund is a platform allowing real estate companies to launch and manage Security Token Offerings (STOs) to receive funding from private investors.
The RedÖDOS blockchain platform supports: Cases management, Health, psychological and legal interventions management and Family tracing